ClosingSite Tools

Overview


In addition to your website, the following tools can be installed on your computer to provide additional functionality.

Outlook Addin

  • Publish emails & attachments direct from Outlook to your website.
  • Send Emails - Select recipients, attachments, and email templates directly from your transaction on your ClosingSite website.
  • Avaliable for use with Outlook 2010 and greater.


  • Word Addin

  • Publish documents as Word (.docx) or Adobe PDF directly to the website (no saving required).


  • Document Publish

  • Drag and Drop documents to publish to your website directly on your desktop.
  • Or add to your File Explorer "Send To" options.

  • Outlook Addin

    The ClosingSite Outlook Addin will allow you to publish emails and documents securely to your website and send emails from your Outlook while selecting files, recipients, email templates, and documents directly from your website.


    Quick Links:
    Install Outlook Addin -  Configure Outlook Settings -  Getting Started - Publishing Received Emails -  Getting Started - Sending Emails -  Troubleshoot -  Update Outlook Addin -  Uninstall Outlook Addin

    Watch our 6 minute video on setting up and using this Add-in.


    Installing the Outlook Addin:

    Step 1: Close all Microsoft Office Programs (including Outlook, Word, Excel, etc.).
    Step 2: Install using a Microsoft web browser (Internet Explorer or Edge).  Using this install the Addin, will Auto Update!
    Copy the following link and paste in the address bar of Internet Explorer or Edge.  

    DO NOT PASTE THIS LINK INTO CHROME OR FIREFOX. THE INSTALL DOES NOT WORK ANDWILL RECIVE A SECURITY ERROR!
    Step 3: Follow install prompts to complete installation.
    Step 4: Install Complete! You can now open Outlook or any Office Program.


    Configuring the Outlook Addin for your website:

    Step 1: Open Outlook.
    Step 2: In your Outlook Menu click the "Addin" tab.
     
    Step 3: In the ClosingSite Group click "Settings".
     
    Step 4: For WebSite URL enter or cut and paste your website url (make sure to use "https").
    https://www.ClosingSite.com
    Step 5: Enter your website Username and Password in the appropriate boxes.
     
    Step 6: Optional - Enable Features
     
      Enable Publish REceived Email - This option turns on/off the option to publish emails to your ClosingSite that are received in Outlook.
       Enable ClosingSite Email - This option turns on/off the option when sending emails to publish the email to your ClosingSite as well as use email templates, select email recipients and attach documents.
      Secure Email Check - select your desired option for Secure/Encrypted(TLS) Email Check on Send .
     
    Disabled - Feature turned off.
     
    Enabled - Default Check - select to always check emails for secure delivery before sending.  You will receive a warning for all emails that do not pass the secure delivery check.
     
    Enabled - Default Not Checked - Only when you selected to check emails for secure delivery will the test be performed.
    Step 7: Optional - Advanced Settings
      Default Show Closed - The initial setting to "Not Checked", the default file list will not include closed files.
      Default Only My  Closings - The initial setting to "Not Checked", the default file list will inlcude all files (not just files to which you are assigned).
      On Publish Category - Select from one of Microsoft's default color categories or create a new category.  By setting a category when an email is published the category on the email will be set to the selected value indicated that the email or documents have been published to your website.  We Recommend create a custom category called "ClosingSite".  If you would like more information on creating categories or adding the category column to your default email view, click this link Create and Assign Color Categories (Microsoft Website).
       
    Step 8: Click "Save Settings" button .
     

    Getting Started - Publishing received emails and/or documents using the Outlook Add In:

    Step 1: Select the email that you wish to publish the email, attachments, and/or email and attachments.  Then click the "CS Publish Email" button in your Outlook Ribbon Bar
     
    Step 2: Select your file/closing from the closing list by clicking the file. The file will highlight and Publish Email, Publish Attachments, Publish Both buttons will enable. By default the top 200 active files will return to your selection list.  If the file you would like to Publish to is not in the list enter the file number and click "Search".  If your file is closed make sure to click the "Show Closed" check box.
     
    Step 3: If Published Attachments or Publish Both was selected: By default the documents will be limited on security to internal users only.  You can choose a document template to auto apply name, completed task, notifications, and security.  When the selected email has more than one attachment, you can switch between attachments/documents by clicking the attachment in the attachment list.  Once you entered the information about your document, click the Continue Button.
     
    Step 4: If Publish Email Or Publish Both was selected: The selected email will display and you can select a task to complete and you can edit the subject of the email that will be published, however you are not allowed to edit the content of the email.
    Step 5: Confirm - Publish:  REVIEW YOUR SELECTED FILE, PUBLISHED EMAIL OPTIONS and PUBLISHED DOCUMENT SETTINGS.  One you have reviewed the items you will be publishing, click the "Confirm - Publish".
     
    Step 6: Publishing Complete - As documents and email are published the confirmation page will change the font color of the completed items to GREEN.  If any item's font color changes to RED, there were errors publishing. Click "Return" to return to Outlook.
     

    Getting Started - Sending using the Outlook Add In:

    Step 1: Use your standard Outlook options to compose a new email, reply to a received email or forward an email.
     
    Step 2: Click the ClosingSite Email checkbox in your Outlook ribbon bar.  
       
      Note - the Addin is not available for replies and forwards that are not opened in a new window. To change your settings to always open replies and fowards in a new window adjust your Outlook Options (File>Options).  
       
    Step 3: Select your file/closing from the closing list by double clicking the file or selecting the desired file then clicking the OK button. By default the top 200 active files will return to your selection list.  If the file you would like to select is not in the list enter the file number and click "Search".  If your file is closed make sure to click the "Show Closed" check box.  
       
    Step 4: Select your desired Email Template, Recipients, and Attachments.  Then Click OK  
       
    Step 5: If an email template was selected, the template will be applied to the body of your Outlook email (for replies and forwards the template email will be added to the existing email).  Selected email recipients will be added to the email.  Document attachments will download and attach to our Outlook email.  
    Step 6: Continue composing and editing your email as you would any Outlook email.  You can add recipients, attachments, and make changes to the subject and body.  
    Step 7: Send your email. Click the "Outlook Send" button.  
    Step 8: Only when you have selected the composed email as a "ClosingSite Email" the following will be perfomed on send.  
      - A secure email check will be performed for all email recipients (this can be done for non "ClosingSite Emails" by check the "Check Secure/Enrypted(TLS)" checkbox.  
      - Attachments will be check for any local attachments and you will be given the option to publish any local attachments to your website  
      - The sent email will be published to the communication log of your ClosingSite  
    Step 9: ClosingSite Email Complete! You will see a brief confirmation screen (this will automatically close after 10 seconds or you can click the OK to close).  

    Update the Outlook Addin:

    Step 1: Close all Microsoft Office Programs (including Outlook, Word, Excel, etc.)
    Step 2: Click the Install Link below
    Step 3: Follow install prompts to complete installation
    Step 4: Update Complete! You can now open Outlook or any Office Program

    Troubleshoot Outlook Addin:

    Issue: When Testing Settings - error message: https://WEBSITEURL - settings Not Valid
    The website address/URL you have inputted for your site is not correct. Check and update Website URL.
       
    Issue: When Testing Settings - error message: User Credentials not valid
    The Username or Password entered for your site is not correct. Check and update Website Username and/or Password.
       
    Issue: In Outlook Addin Menu Item not showing
    In Outlook click "File>Options". Select Add-ins on the left menu. Check to see if ClosingSite Outlook Addin has been disabled or removed. If the Addin does not show as being installed after running the intallation, try the alternate install option or contact your IT Administrator because you may not have permissions to install on programs.
       
    Issue: ClosingSite Addin keeps getting disabled by Outlook
    This commonly occurs when Outlook was not closed when the Addin was installed. Use Add/Remove programs on your computer to first remove the ClosingSite Outlook Addin then reinstall. If this does not correct the issue, please contact ClosingSite support at support@closingsite.com or 888-590-0999 ext52.

    Uninstall/Remove the Outlook Addin:

    To uninstall/remove the Outlook Addin, use your computer's Add/Remove Programs to remove "ClosingSite Outlook Addin".

    Microsoft Word Addin

    The ClosingSite Word AddIn will allow you to publish a word document (or PDF) securely to your website directly from Microsoft Word.


    Quick Links:
    Install Word Addin -  Configure Word Settings -  Getting Started - Publishing Word Documents -  Troubleshoot -  Update Word Addin -  Uninstall Word Addin


    Installing the Word Addin:

    Step 1: Close all Microsoft Office Programs (including Word, Outlook, Excel, etc.).
    Step 2: Install using a Microsoft web browser (Internet Explorer or Edge).  Using this install the Addin, will Auto Update!
    Copy the following link and paste in the address bar of Internet Explorer or Edge.  
     
    DO NOT PASTE THIS LINK INTO CHROME OR FIREFOX. THE INSTALL WILL RECIVE A SECURITY ERROR!
    Step 3: Follow install prompts to complete installation.
    Step 4: Install Complete! You can now open Word or any Office Program.


    Configuring the Word Addin for your website:

    Step 1: Open Word.
    Step 2: In your Word Menu click the "Addin" tab.
     
    Step 3: In the ClosingSite Group click "Publish Document".
     
    Step 4: For WebSite URL enter or cut and paste your website url (make sure to use "https").
    https://www.ClosingSite.com
    Step 5: Enter your website Username and Password in the appropriate boxes.
     
    Step 6: Default Show Closed - selected your desired option.  The initial setting to "Not Checked", the default file list will not include closed files.
    Step 7: Check box - Publish as Pdf or Docs - Select desired option to default published document to publish as PDF or Word docx.
    Step 8: Click "Test Settings Button" .
      If you receive the message "Settings Valid" click OK otherwise check your website url, username and password.
     
    Step 9: Click "Save Settings", setup complete.

    Getting Started - Publishing documents using the Word Addin:

    Step 1: Open an existing or create a new Word document. When ready to publish, click the "CS Publish Email" button in your Word Add-ins menu.
    Tip: if you right click the "CS Publish Document" icon/button, you can select Add to Quick Access Toolbar.  This will make the Publish button available without having to click on Add-ins menu.
     
    Step 2: Select your file/closing from the closing list by clicking the file. The file will highlight and Publish Document button will enable. By default the top 200 active files will return to your selection list.  If the file you would like to Publish to is not in the list enter the file number and click "Search".  If your file is closed make sure to click the "Show Closed" check box.
     
    Step 3: Click Publish Document. By default the documents will be limited on security to internal users only.  You can choose a document template to auto apply name, completed task, notifications, select to publish as PDF and security.  Once you entered the information about your document, click the Continue Button.
     
    Step 4: If the transaction has existing documents, you will given the option to publish your document as a New (Add) document on your website or replace an existing document. To Replace existing select the "Replace Existing Document" radio button then select the document you would like to replace. Once you have made your Add or Replace selection, Click Continue.
    Tip: preview versions of documents are retained for existing internal users to access.
     
    Step 5: Confirm - Publish:  REVIEW YOUR PUBLISHED DOCUMENT SETTINGS.  One you have reviewed the document settings, click the "Confirm - Publish".
     
    Step 6: Publishing Complete - As documents are published the confirmation page will change the font color of the completed items to GREEN.  If any item's font color changes to RED, there were errors publishing. Click "Return" to return to Word.
     

    Update the Word Addin:

    Step 1: Close all Microsoft Office Programs (including Word, Outlook, Excel, etc.)
    Step 2: Click the Install Link below
    Step 3: Follow install prompts to complete installation
    Step 4: Update Complete!  You can now open Word or any Office Program

    Troubleshoot Word Addin:

    Issue: When Testing Settings - error message: https://WEBSITEURL - settings Not Valid
    The website address/URL you have inputted for your site is not correct. Check and update Website URL.
       
    Issue: When Testing Settings - error message: User Credentials not valid
    The Username or Password entered for your site is not correct. Check and update Website Username and/or Password.
       
    Issue: In Word Addin Menu Item not showing
    In Word, click "File>Options". Select Add-ins on the left menu. Check to see if ClosingSite Word Addin has been disabled or removed. If the Addin does not show as being installed after running the intallation, try the alternate install option or contact your IT Administrator because you may not have permissions to install programs.
       
    Issue: ClosingSite Addin keeps getting disabled by Word
    This commonly occurs when Word was not closed when the Addin was installed. Use Add/Remove programs on your computer to first remove the ClosingSite Word Addin then reinstall. If this does not correct the issue, please contact ClosingSite support at support@closingsite.com or 888-590-0999 ext52.

    Uninstall/Remove the Word Addin:

    To uninstall/remove the Word Addin, use your computer's Add/Remove Programs to remove "ClosingSite Word Addin".

    Document Publish

    The ClosingSite Document Publish windows application will allow you to publish any document securely to your website directly from your desktop.


    Quick Links:
    Install -  Configure Settings -  Getting Started - Publishing Documents -  Troubleshoot -  Update Application -  Uninstall Application


    Install ClosingSite Document Publish:


    Step 1:Use the link below to download and install ClosingSite Document Publish


    Unzip installation from your downloads folder. Then from the unzip location run setup.exe.

    Step 2: Follow install prompts to complete installation
    Step 3: Install Complete


    Configuring ClosingSite Document Publish for your website:

    Step 1: Open ClosingSite Outlook Publish from installed folder (C:\Program Files (x86)\ClosingSite\ClosingSite Document Publish) - Run ClosingSite Publish Document.exe
      The first time this program is run a settings window will open.
    Step 2: For WebSite URL enter or cut and paste your website url (make sure to use "https")
    Step 3 Enter your website Username and Password in the appropriate boxes.
     
    Step 3: Default Show Closed - selected your desired option.  The initial setting to "Not Checked", the default file list will not include closed files.
    Step 4: Click "Test Settings Button"
      If you receive the message "Settings Valid" click OK otherwise check your website url, username and password.
     
    Step 5: Click "Save Settings"
    Step 6: To add the Drag and Drop icon to your desktop, click "Create Desktop Shortcut"
    Step 7: To add ClosingSite Publish as an option in your Windows File Explorer "Send To" list, click the "Add ClosingSite Publish to "Send To" List.
    Step 8: Setup Complete - Click Return

    Getting Started - Publishing Documents:

    Publishing a document using the Drag and Drap
    Step 1: Select document you wish to publish by dragging and dropping the document to the ClosingSite Publish desktop icon
     
      OR
      Right click the document and select ClosingSite Publish in the "Send To" options.
     
    Step 2: Select your file/closing from the closing list by clicking the file. The file will highlight Publish Document button will enable.  Click Publish Document to publish to the selected file. By default the top 200 active files will return to your selection list.  If the file you would like to Publish to is not in the list enter the file number and click "Search".  If your file is closed make sure to click the "Show Closed" check box.
     
    Step 3: You can choose a document template to auto apply name, docucment name, completed task, notifications, optionally convert to PDF and set security.  Once you entered the information about your document, click the Continue Button.
     
    Step 5: Confirm - Publish:  REVIEW YOUR SELECTED FILE and PUBLISHED DOCUMENT SETTINGS.  One you have reviewed the items you will be publishing, click the "Confirm - Publish".
     
    Step 6: Publishing Complete - As documents and email are published the confirmation page will change the font color of the completed items to GREEN.  If any item's font color changes to RED, there were errors publishing. Click "Close" to exit.
     

    Update the ClosingSite Document Publish:

    Step 1: Close ClosingSite Document Publish if it is currently open.
    Step 2:Use the link below to download and install ClosingSite Document Publish


    Unzip installation from your downloads folder. Then from the unzip location run setup.exe.

    Step 3: Follow install prompts to complete installation
    Step 4: Update Complete

    Troubleshoot ClosingSite Document Publish:

    Issue: When Testing Settings - error message: https://WEBSITEURL - settings Not Valid
    The website address/URL you have inputted for your site is not correct. Check and update Website URL.
       
    Issue: When Testing Settings - error message: User Credentials not valid
    The Username or Password entered for your site is not correct. Check and update Website Username and/or Password.

    Uninstall/Remove the ClosingSite Document Publish:

    To uninstall/remove the application, use your computer's Add/Remove Programs to remove "ClosingSite Document Publish".

    When requested by our support team, enter a your name and provided support key below to lanch remote desktop sharing:

    or https://fastsupport.gotoassist.com/

    ClosingSite SoftPro Add-in

    Requirements:

    • Administrative access – must have the access rights to run software installations on the computer.
    • SoftPro Select Client installed on the computer.
    • CLOSE SOFTPRO SELECTS BEFORE INSTALLING OR UPDATING.

    New Installation and Updates:

    1. Download the installation program.
      1. https://www.closingsite.com/Files/SoftPro/ClosingSiteSoftProAddinInstall.exe
      2. When the download completes, right click the ClosingSiteSoftProAddinInstall.exe in the downloads folder and select “Properties.”
      3. If there is a checkbox for “Unblock”. Check “Unblock” and click “Ok”.

    2. Right Click ClosingSiteSoftProAddinInstall.exe in your downloads folder and select Run as Administrator. If a message displays “Do you want to allow this app to make changes to your device”, Click “Yes”.
    3. The installer will unzip to C:\_ClosingSiteSoftProAddinTemp and automatically run the installation program C:\_ClosingSiteSoftProAddinTemp\ClosingSiteSoftProAddin.exe.
      1. Click the “Install ClosingSite SoftPro Addin” button. By default, the installer will create backup of the C:\Program Files (x86)\SoftPro\Select folder in the C:\_ClosingSiteSoftProAddinTemp directory
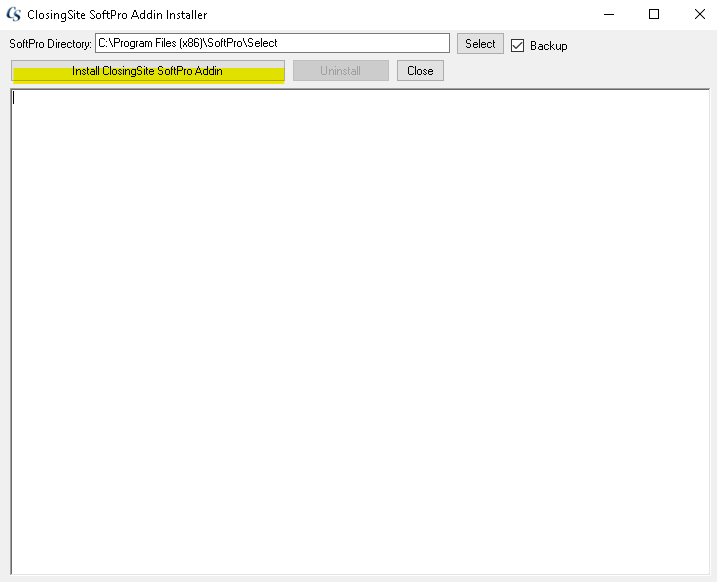
    4. Once the Installation completes a message box will display “Update Complete - You can open SoftPro”

    5. For New Installation:

    6. Open SoftPro Select. In the menu click “ClosingSite” and then click “ClosingSite Tools

    7. Click “Account Settings” in the toolbar

    8. Enter the Website URL, Username and Password that you have been provided and click “Verify Account”

    9. Verify Account will display “User Login Valid” if your settings are correct. If you are not able to login, recheck the settings or call support 888-590-0999 ext 2.
    10. Use the “Click To Enable” to select the Addin Features you wish to turn on. Note, the feature list will vary.

    11. Click “Save Settings